
One of our company goals to start 2021 was to regularly “test” our athletes. We thought this would be (1) fun for the athlete, and (2) help guide our decision making process regarding programs and education. What we didn’t expect was how much tighter it made our community of lifters. It’s been a great experience to watch them cheer for each other, send videos to one another and family, and to generally get more excited about training.
Today, we are going to lay out some basics around testing week. The plan is for this article to be a useful resource for our athletes but perhaps it will benefit you, the reader, as well. Over time, we’ll likely make updates to keep pace with our current thoughts on training / testing.
Test Week Structure & Purpose
Generally speaking, test weeks are “low volume” in that we are asking the athlete to work up to some “heavy” singles. This allows for some practice for test day while also allowing some of the training-related fatigue to dissipate. The idea here is that the athlete is feeling great on test day. Let’s look at the actual structure.
Day 1 (Mon or Tues)
- Primary Squat 1 rep @6, 1 rep @7, 1 rep @8 (no back offs)
- Primary Press 1 rep @7, 1 rep @7, 1 rep @8 (no back offs)
- Primary Pull 1 rep @6, 1 rep @7 (no back offs)
Day 2 (Wed or Thurs)
- Primary Squat 1 rep ~ 80% of E1RM
- Primary Press 1 rep ~ 80% of E1RM
- Primary Pull – none
Day 3 (Fri or Sat)
- Primary Squat 1@8, 1@9, 1@10
- Primary Press 1@8, 1@9, 1@10
- Primary Pull 1@8, 1@9, 1@10
Sat or Sun the athlete may do some very light circuit or aerobic work to loosen up and prepare for the next block to start. Now that we’ve seen how the test week is generally laid out (and the RPEs may be titrated up / down to better serve the athlete), let’s look at some useful tips heading into testing.

Calculate your Estimated 1 Rep Maxes (E1RMs)
Recently, we published an article on 3 Ways to Use RPE. We suggest you give it a read if you haven’t done so. In the article we discuss how to calculate an estimated 1 rep max for your upcoming test week. Let’s make some assumptions to provide a useful example.
Our lifter, Sharon, has been training for the past 90 days and is planning on testing her “primary lifts”. In the context of powerlifting, Sharon would be testing her 1 sec pause bench press, back squat, and deadlift. However, most of our athletes aren’t powerlifters so it’s not uncommon to see other barbell lifts being tested. During her Beginner Program, here were Sharon’s primary lifts:
- Parallel Box Squat
- Overhead Press
- Sumo Deadlift
As Sharon wrapped up her last few weeks of training, here were her numbers.
- Parallel Box Squat 155 lbs. x 1 rep @7
- Overhead Press 92.5 lbs. x 1 rep @8
- Sumo Deadlift 185 lbs. x 1 rep @7
Using this data, we can calculate Sharon’s E1RMs. Let’s use our RPE chart to do this.
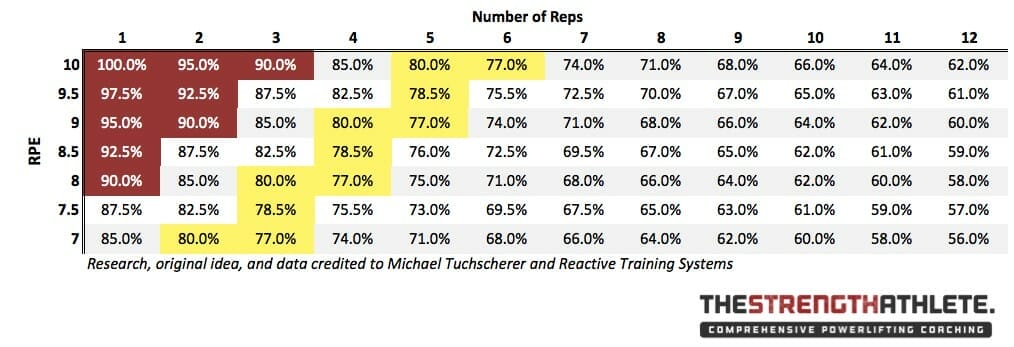
As you can see, 1 rep @7 = approximately 85% of your E1RM, while 1 rep @8 represents approximately 90%. Using the numbers Sharon hit, here are her E1RMs.
- Parallel Box Squat 155×1@7 (155/.85) = 182.5 lbs.
- Overhead Press 92.5×1@8 (92.5/.9) = 102.5 lbs.
- Sumo Deadlift 185×1@7 (185/.85) = 217.5 lbs.
Using this data, Sharon should enter her test week planning on the following numbers.
- Parallel Box Squat 1@6 (145 lbs.), 1@7 (155lbs.), and 1@8 (165lbs.)
- Overhead Press 1@6 (82.5lbs), 1@7 (87.5lbs.), and 1@8 (92.5lbs.)
- Sumo Deadlift 1@6 (174lbs.), and 1@7 (185lbs.)
Assuming these numbers and RPEs matched up then Sharon would simply run out the rest of the week, planning on hitting her numbers on day 3. If these numbers felt heavier than expected, she may reassess her E1RM. Let’s assume that her 1@6 felt more like an @7 or @8, Sharon would then use the associated percentages to adjust her E1RM heading into day 2 and 3.
It’s important not to get too rattled if the weights feel “heavy” on day 1 of test week as your fatigue is likely very high. The point of the week is to allow for some of that fatigue to go away. I usually recommend staying the course unless something is wildly off for the athlete.

Warm Up Appropriately
We’ve taken the time to calculate our E1RMs so we can now put together a reasonable warm up to get there. Keep in mind that our goal during test week is to hit heavy singles. As such, we don’t want to be doing a really elaborate (or high volume) warm up. We certainly don’t need any specialized warm up with “activation exercises”. We’ll just use some common sense getting to heavy weights.
We already know the order of exercises, unless we’ve put together a specialized template for an athlete. We’ll be performing squat work, followed by pressing, and wrap up with pulling. This follows a traditional powerlifting format and who are we to change it? Let’s look at an example for a lifter’s squat work.
Squat E1RM = 315 lbs.
- Target Weights (day 1) are 1@6 (250lbs.), 1@7 (267.5lbs.), and 1@8 (285lbs.)
If we know our first set will be approximately 250 lbs., we need to get our body ready. Here is what a sample warm up could look like:
- Empty (45lbs.) Barbell 10 reps x 2 sets
- 135 lbs. x 5 reps
- 185 lbs. x 3 reps
- 205 lbs. x 1 rep
- 225 lbs. x 1 rep
- Target set of 250 lbs.
If this amount of volume seems like it’s too high then you need to be in better shape. This is 10 total reps (not counting the empty barbell) and all are at or below 70%. This should not tire anyone out AND having smaller jumps like the ones noted above will allow the lifter to actually assess their RPEs rather than just hoping they workout.
We generally don’t give percent values as warm up sets because the E1RM can really throw that approach off. In the example above, our lifters E1RM is 315 lbs. so the first work set of 135 lbs. make sense (this is ~ 42%), but what if our lifter’s E1RM was 495? Using the percentage approach (sticking w/ 42%), the first warm up set would be 205. It’s certainly reasonable for the lifter to start there but it just seems weird to skip 135 lbs. so we don’t do it that way.
Make Appropriate Weight Selections
One of the most useful things I have ever learned about using RPE is that, often, a 5% jump in bar weight will result in ~ 1 point RPE increase. Of course this works in reverse as well. It’s really pretty neat, and while not exact, holds true a lot of the time. We use in in method #1 of our 3 Ways to Use RPE article noted above. The relevance here is that if you’re having an off day (or great day), your weight selections may be altered. Let’s assume you’re kicking ass (because that’s more fun than having a bad day), here is what might happen:
- 1@8 (90% of E1RM) felt like more like an 1@7.
- 1@9 (95% of E1RM) felt more like an 1@8.
- 1@10 (100% of E1RM) wasn’t a max
I’d instruct the athlete to take an adequate rest (3-5 minutes) and make another attempt. It’s likely we’d jump about 5%. This is an incredibly useful tool to have on test / meet day. There’s nothing worse than expecting to hit 500 for your 3rd attempt and 405 feels like a ton of bricks. And, it happens so you better have a back up plan. When this happens, using the 5% method for working up / down is incredibly useful.

There you have our top 3 tips for Test Week, we hope they help. At Brentwood Barbell, we test our athletes quarterly (assuming they aren’t doing any formal competitions). This allows us to continually assess and keep them moving toward their goal(s). If you haven’t moved toward your goals in a while and aren’t sure how to get there, fill out our Coaching Application and we’ll talk it out with you. We’d love to help.
You might also enjoy:
How Much Weight Should I Lift?
Good Luck w/ Your Training Friends
James Harris, MPT